 |
|
|
|
|
|
|
|
|
|
|
|
|
|
|
|
|
|
|
|
|
|
|
|
|
|
|
|
|
|
|
|
|
|
|
|
|
|
|
|
|
|
|
|
|

Click here for a printer friendly page.
Our Decals are made from 7 year, self-adhesive, all-weather vinyl film. Vinyl comes on it's own backing paper. The lettering or graphic image is die-cut into the vinyl, and then all the vinyl that doesn't belong is removed by hand. Then the vinyl image is sandwiched between it's own backing paper and a layer of transfer tape. The transfer tape holds the vinyl image together while you transfer it onto the destination surface. Once the image is placed as desired and pressed on, the transfer tape is then removed - leaving only the die-cut vinyl image.
Our decals and stickers adhere to non-porous, non-textured, smooth surfaces, such as painted surfaces, metal, smooth sanded or finished wood, lacquered surfaces, glass, painted fiberglass, plastic, other vinyl, and leather. Surfaces like vinyl and leather that have been treated with Armor All or another oily type substance must be thoroughly cleaned before application.
There are two basic
methods for applying vinyl decals.... the wet way and the dry way...
General rule of thumb is that you do what works best for you. All decals
can be applied using either method, it really comes down to size and/or
personal preference. The dry way is faster, the wet way is safer.
Smaller stickers can usually be "dropped" dry onto the surface without
having to be taped up and done in sections. Larger decals should be done
wet, or must be taped
in place and laid down in sections. Either way, be careful and work
slow. Dry applied decals tend to stretch out if they stick by accident (and then
have to be pulled off and re-stuck), and this can easily distort the
decal. The wet method allows you to slide, or remove the decal
and re-position it safely during the application.
*
Professional Tip:
Always lay
out your decals flat and go over them with a squeegee or credit card
after you remove them from the shipping tube and before you
start the application process. This is to re-affix the transfer tape to
the decal after shipping, should any separation occur. The rolling up of
decals for shipping can sometimes cause separation of the transfer tape
from the decal in spots, making small air pockets... which is normal and
easily fixed. A simple laying flat and giving it a once over with a
credit card or other straight edge will make sure your decal's transfer
tape is nice and evenly stuck before you begin the application process.
The tape only needs to carry the image.
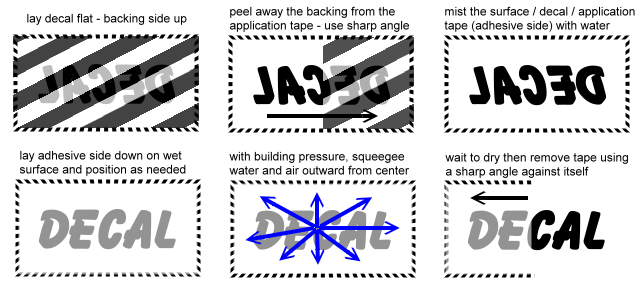
Instructions - Wet Method
1. Trim decals as
needed. Clean your destination surface. The cleaner the better.
2. Lay the decal flat, backing side up. Using a sharp angle - peel the
vinyl-backing away from the transfer-tape (that is holding the vinyl
image). Be careful that all elements of the decal stay stuck to the
transfer tape, and not the backing.
3. Mist the decal and transfer tape (sticky side) and the destination
surface. Clean water slides less but sticks better. You can add a drop
or two of dish soap to the water for easier positioning of larger
decals. Too much soap can cause problems with adhesion, so just a drop
or two.
4. Place the transfer tape holding the decal onto the destination
surface as desired. You can slide it around a little. Be careful of
small lines and details.
****When centering, NEVER MEASURE using THE TRANSFER TAPE! Always
measure from the actual decal image, which you can see through the
transfer tape.
5. Once aligned - Starting from the image-center and moving outward,
squeegee out all the water and air bubbles. Start with light
pressure, and slowly build with each pass over the graphic.
6. Let the image stay on the surface with the transfer tape on
for as long as it takes to dry. Direct sunlight on hot, dry days will
speed this up. On cold, humid and rainy days can take up to 24 hours or
even longer to fully adhere. Rule of thumb, if you are not sure whether
or not it�s dry, and you did a really nice job putting it on, then don't
be in a rush taking of the transfer tape (and risk messing it all up)...
Be patient!
7. Once fully dry, begin peeling the transfer tape off using a sharp
angle against itself. This helps to keep your vinyl decal from
pulling off the surface if it�s not fully adhered in all places. If the
vinyl is not sticking, it's not dry yet, or the surface was not clean.
If the image comes off the surface (still sticking to the application
tape), simply lay back down, taking care not to create any air bubbles,
and squeegee as before, and give it more time to dry and fully adhere.
Wet method applied decals should not take more than 48 hours to fully
adhere. See the illustration below:
![]()
Dry Method
1. Clean your destination
surface. The cleaner the better.
2. With your decal as-is (still taped up), lay your decal (backing-side
down, transfer-tape-side up) and align as you like it. It should be
adhesive side down, looking like it will look after applied. Once you
get it lined up how you like it...
3. Place a strip of masking-tape (vertically) down the center of the
image to hold in place, over-lapping the edge onto the destination
surface. Make sure the image won't move. Once fixed...
4. Pull one side of the decal (the entire decal - transfer tape, backing
and all) back flat against itself, folding over the
masking-tape center-line that you just placed to hold it down. Don't
crease it, just "bend" it or "fold" it.
5. Using a sharp angle, start in a corner and peel away the
decals backing (away from the transfer tape that is holding the vinyl
image) until you get to the masking-tape-center-line you laid
to hold it in place. Keeping the vinyl (on the application-tape) pinned
back with your finger, cut away the removed backing along the
center-placement-tape line. Careful not to scratch your surface or cut
your vinyl image. Do not try and tear the paper, this will create fuzz
and dust that may create bumps under the decal.
6. Using any squeegee like item (a credit card works well), begin to lay
your graphic down onto your prepared surface from the masking-take
center line outward. DO NOT LAY DOWN ALL AT ONCE! Hold the image at an
angle above the destination-surface, and slowly, starting at the
center-placement-tape-line, press down the image from the center out
using the squeegee. Squeegee from the center-tape-line outward as you
lay it down, taking care to no allow air bubbles to form between the
vinyl and the surface.
7. Once one side is laid down, remove the center-tape-line, then remove
the other half of the vinyl backing the same way as before, and repeat
the process for the other side.
8. Squeegee the entire image a few times, from the center outward, each
time with greater pressure, making sure that all of it is good
and pressed onto the surface.
9. Once you feel it is pressed on as good as can be, begin peeling the
transfer tape off using a sharp angle against itself. If the image
comes off the surface (sticking to the transfer tape), simply lay back
down, and squeegee as before, then try again
- remember, a sharp angle works best when separating vinyl from
either the backing or the tape. If the decal does not stick, the surface
was not fully cleaned, and may have oils or dust. See the illustration
below for additional help.

|
||||